How to setup the Java SDK and use JavaFX with macOS/Windows
Software engineer and founder with a background in finance and tech. Currently building aVenture.vc, a platform for researching private companies. Based in San Francisco.
Related Java Setup Guides
-
Core Guide: Java, Maven & Gradle Setup & Usage- This Article: Specifics for Setting up JavaFX -
Overview: JavaFX Key Components
This guide focuses on setting up a JavaFX development environment. Key parts: - JDK Setup:
Assumed to be done. For initial JDK installation and JAVA_HOME setup, refer to the
. - Build Tool (Maven/Gradle): Manages JavaFX libraries as project dependencies. This is covered in detail in the
Core Java Guide. This article will show JavaFX-specific dependency examples. - FXML: XML for UI layout, separating design from Java logic. - SceneBuilder: Visual tool for FXML design.
Part 1: JavaFX Project Setup in IDEs
This section assumes your JDK is installed and JAVA_HOME is configured as per the Core Java Guide. We'll focus on IDE integration for JavaFX.
What is JavaFX?
JavaFX is a toolkit for developing graphical (GUI) applications in Java. Since Java 11, it's no longer bundled with the JDK. It's best managed as a project dependency via Maven or Gradle. Avoid installing JavaFX system-wide.
1.1: VS Code with Java Extension Pack
1.2: IntelliJ IDEA (Community or Ultimate)
Version Compatibility for JavaFX
- JDK 21
JavaFX 21 (or a version compatible with your JDK, such as JavaFX 22+ for JDK 21+)
Scene Builder 23 (or the latest corresponding LTS)
Ensure your pom.xml or build.gradle reflects these versions. See
Part 5.1 for a pom.xml example.
Part 2: Integrating Scene Builder
Scene Builder is a visual layout tool for designing JavaFX UIs (.fxml files).
2.1: Download and Install Scene Builder
Visit the Gluon Scene Builder website to download the latest version (LTS recommended, e.g., 23). Install it.
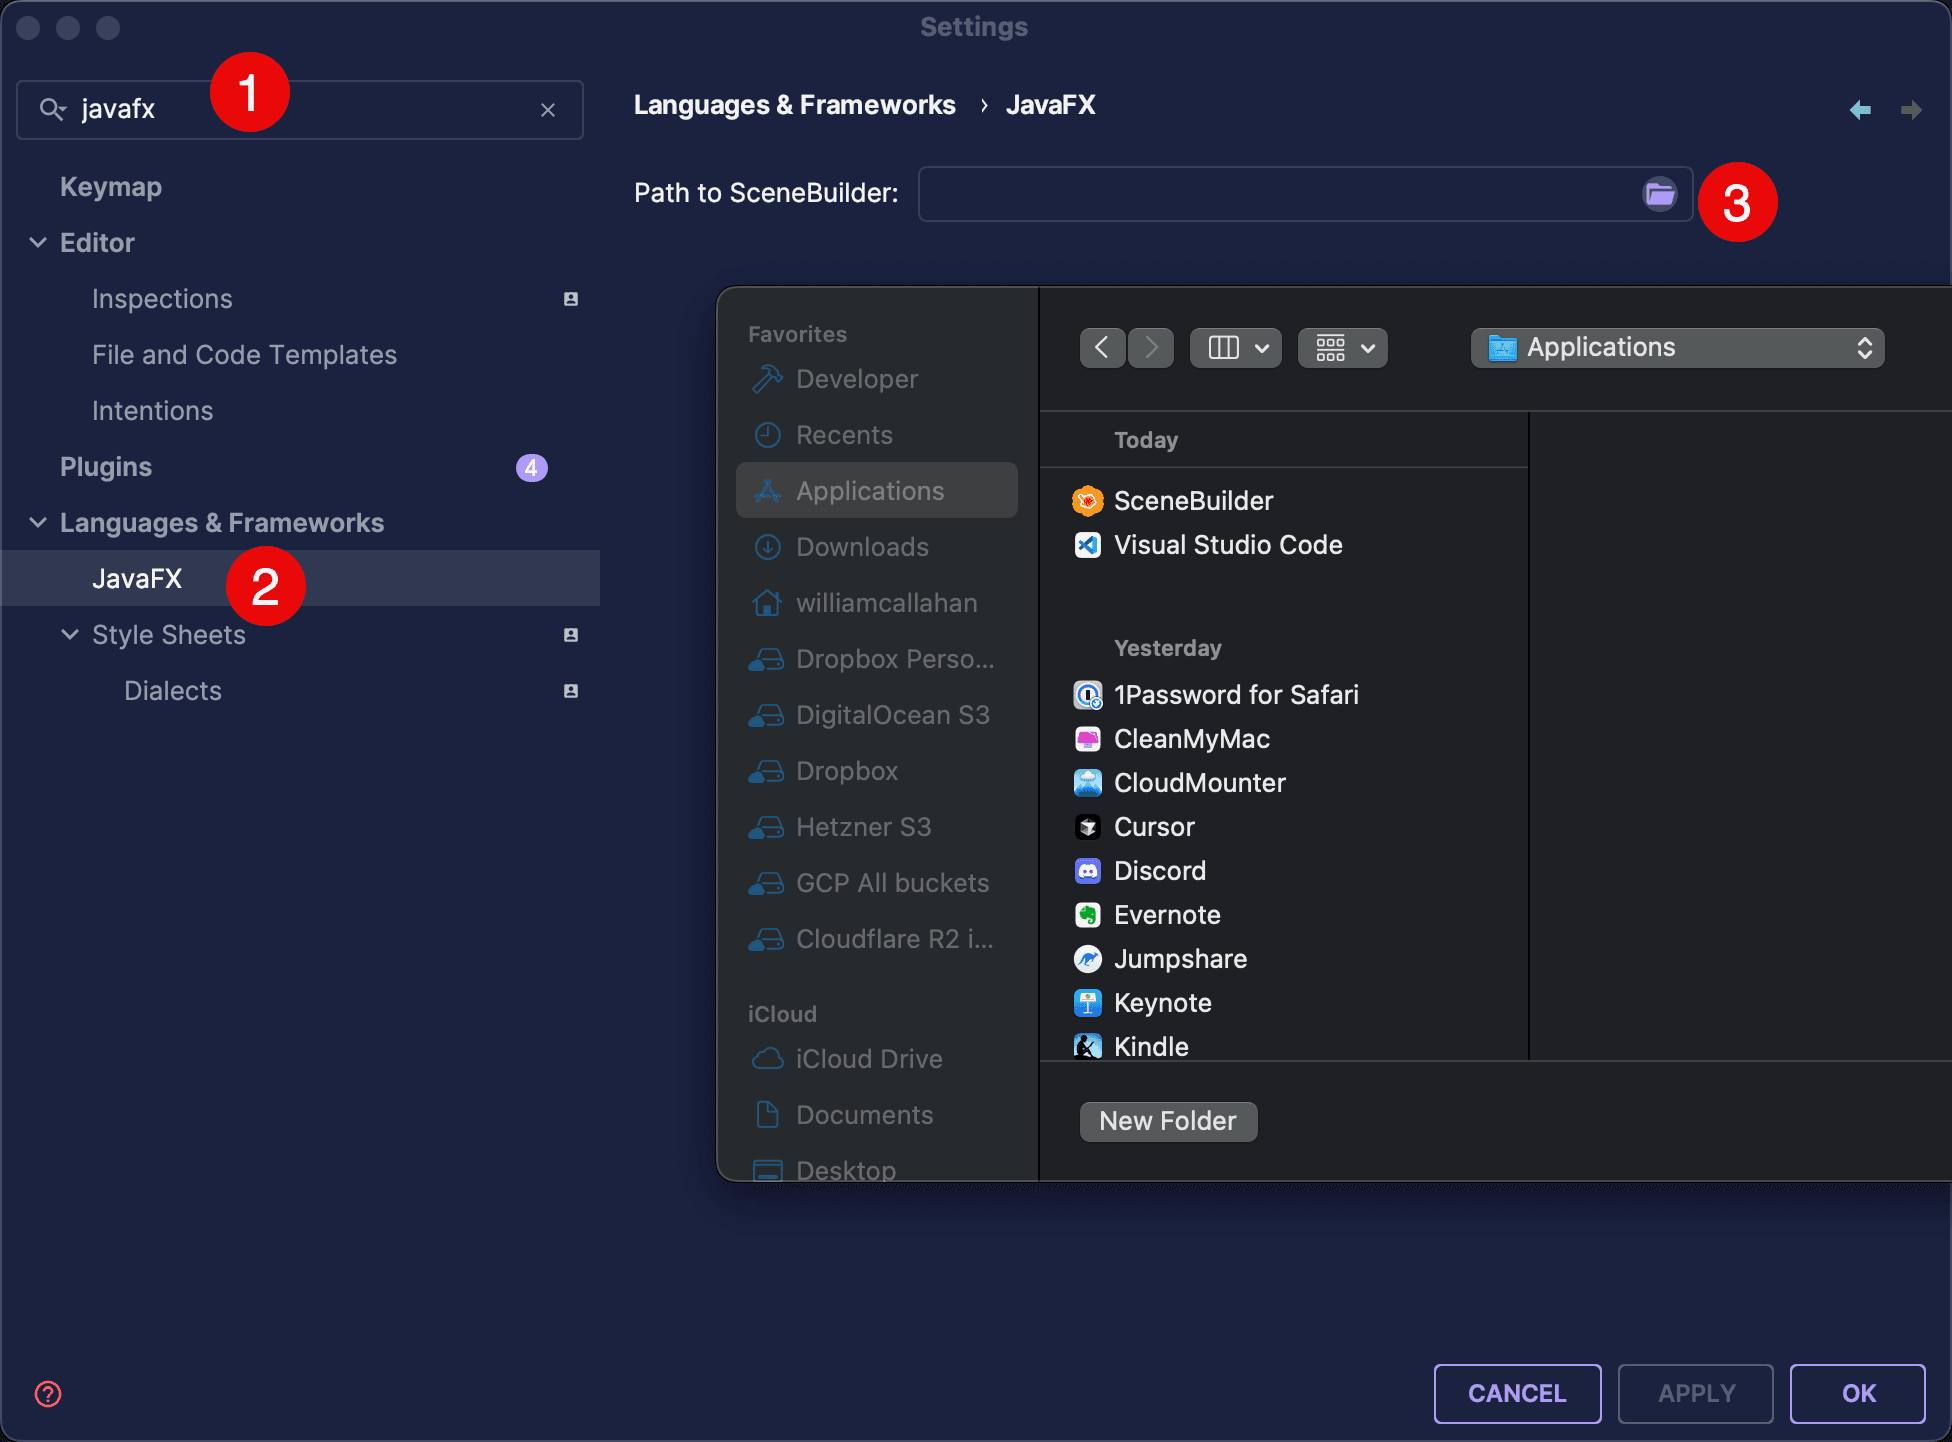
2.2: Configure Path in IntelliJ IDEA
- Go to Settings/Preferences > Languages & Frameworks > JavaFX.
- Set "Path to SceneBuilder" to your installation (e.g.,
/Applications/SceneBuilder.appon macOS, orC:\Program Files\SceneBuilder\SceneBuilder.exeon Windows).

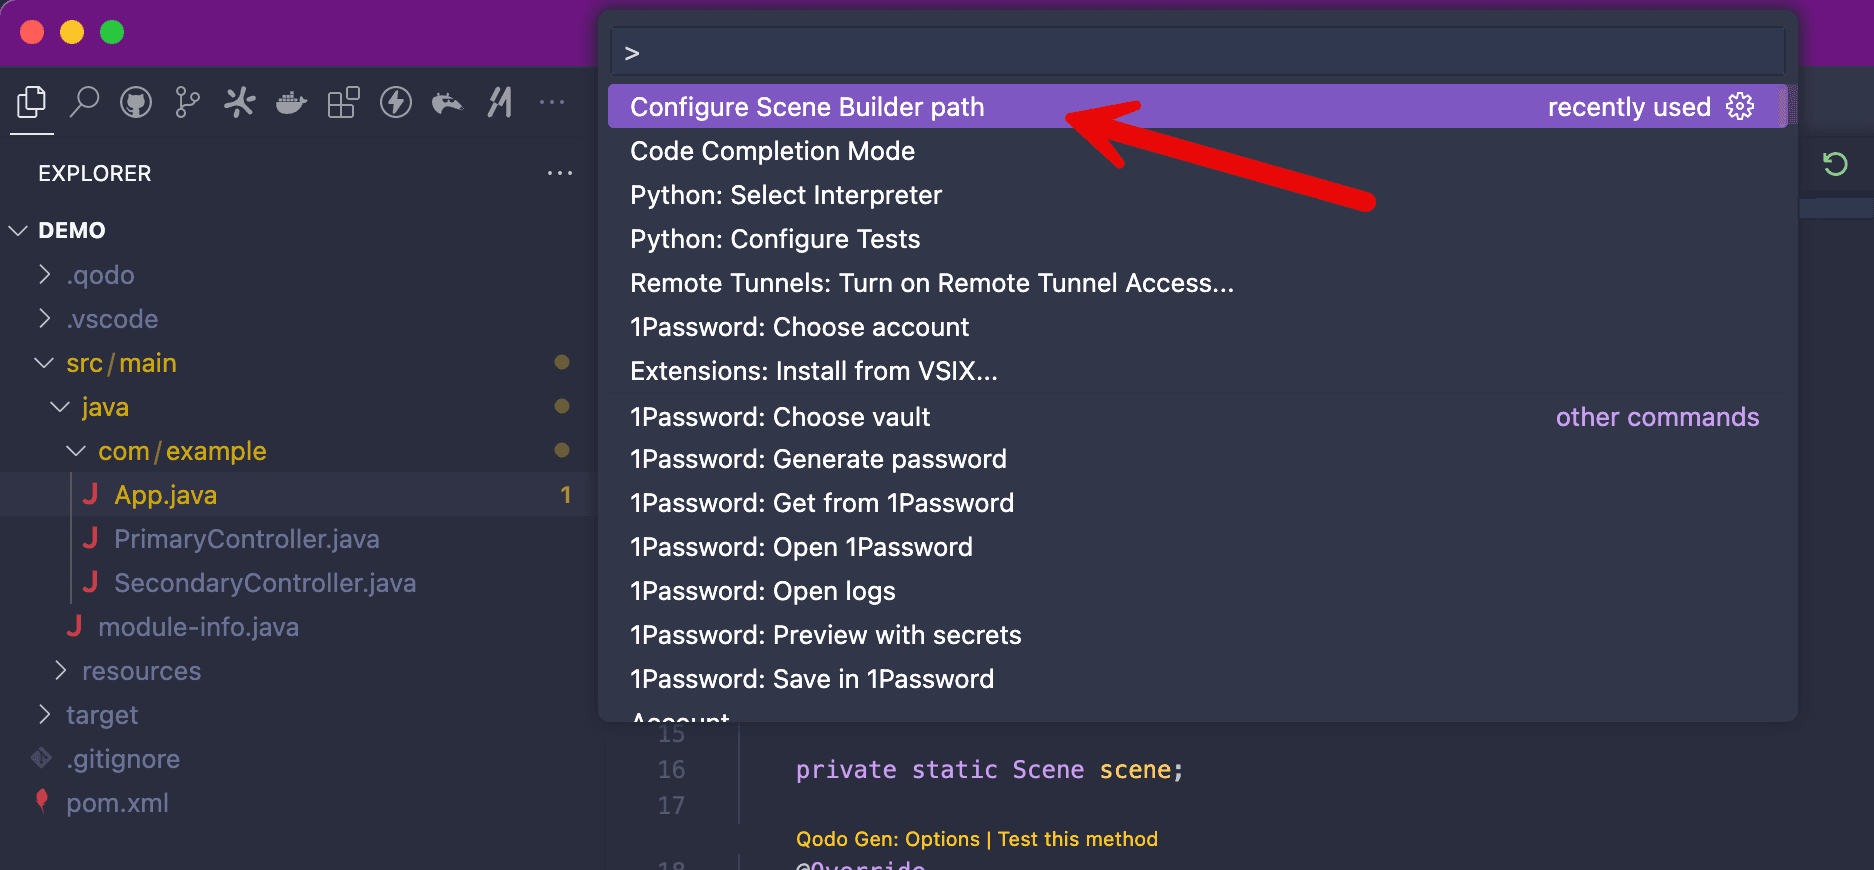
2.3: Configure Path in VS Code
- Install the SceneBuilder extension for Visual Studio
Code. *
Open the Command Palette (Cmd+Shift+P on macOS, Ctrl+Shift+P on Windows) * Type
Configure Scene Builder pathand press enter * Browse to and select your installed Scene Builder executable
- Once configured, you can right-click an
.fxmlfile in the VS Code explorer and choose "Open in Scene Builder". We'll cover how to create the project and open it in Scene Builder in the next step below.
Does Scene Builder require environment variables?
Scene Builder is self-contained and doesn't need JAVA_HOME. It edits .fxml files directly.
You only need to configure the path within your IDE to enable direct opening of FXML files.
Part 3: Creating a JavaFX Project
With your JDK and Scene Builder configured, create a new JavaFX project.
3.1: Create New Project in IntelliJ IDEA
- File > New > Project...
- Select JavaFX.
- Choose your project SDK (e.g., Java 21).
- Select Maven or Gradle as the build system.
- Fill in project details (Name, GroupId, ArtifactId). Click Create.

3.2: Create New Project in VS Code
- Open the Command Palette (Cmd+Shift+P on macOS, Ctrl+Shift+P on Windows).
- Type
Java: Create Java Projectand press Enter - Select JavaFX from the list
- It'll ask for your desired repository version number for this new project, you can just hit enter to proceed with the default ('version' 1.0-SNAPSHOT)
- When prompted to confirm (Y/N), make sure you hit N to be able to change the JavaFX version to 21 (no other details should need changed, just hit enter to proceed with the default each time)
- Choose a folder location for your new project

- Once created, VS Code will open the new project. You can test run it:
- Open the
App.javafile (usually undersrc/main/java/com/example/). - Click the "Run" button that appears above the
mainmethod or press F5.
- Open the

-
After the project is successfully created, VS Code will show a notification. Click Open to load the project in a new window.
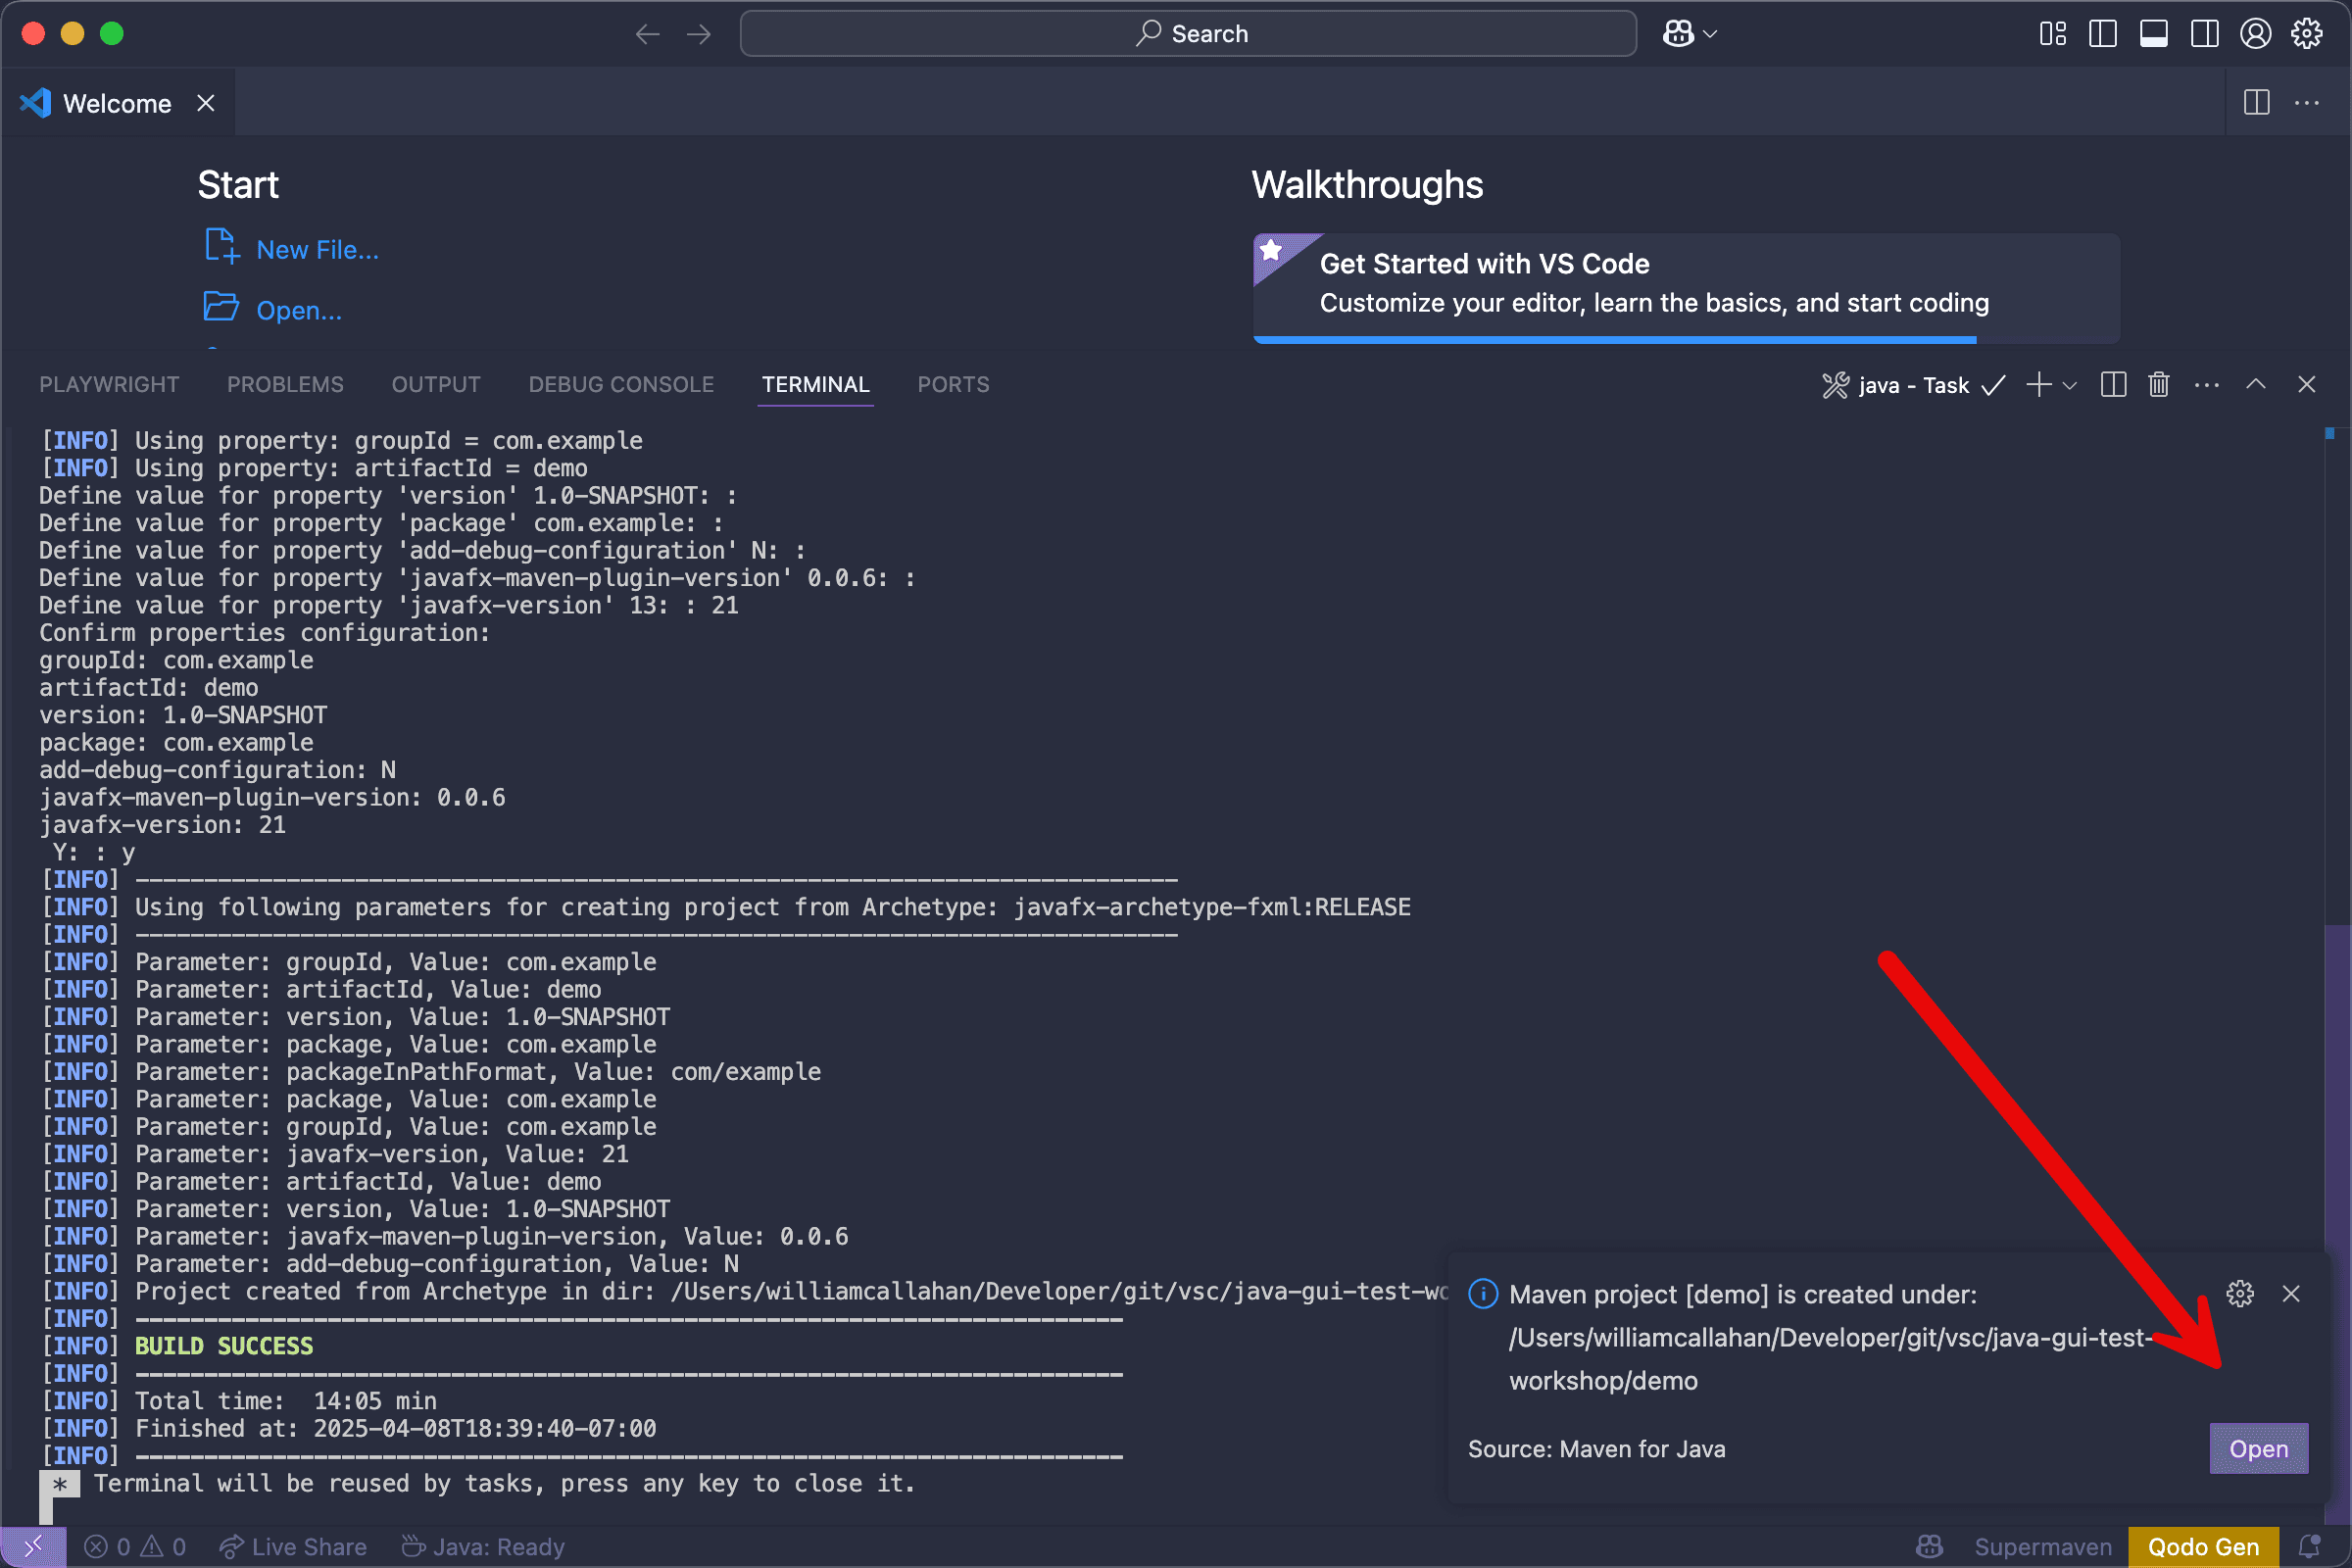
Click the 'Open' button in the notification to open your new JavaFX project
JavaFX Application Components
- FXML Files (
primary.fxml, etc.): XML for GUI layout. - Java Controllers: Logic for FXML views. - Scene Builder: Visual FXML editor. - Build File (pom.xml/build.gradle): Manages JavaFX library dependencies. FXML promotes separation of UI design from application logic.
Part 4: Opening FXML Files in Scene Builder
Once your project is open and Scene Builder path is configured (Part 2), edit FXML files from your IDE.
4.1: IntelliJ IDEA
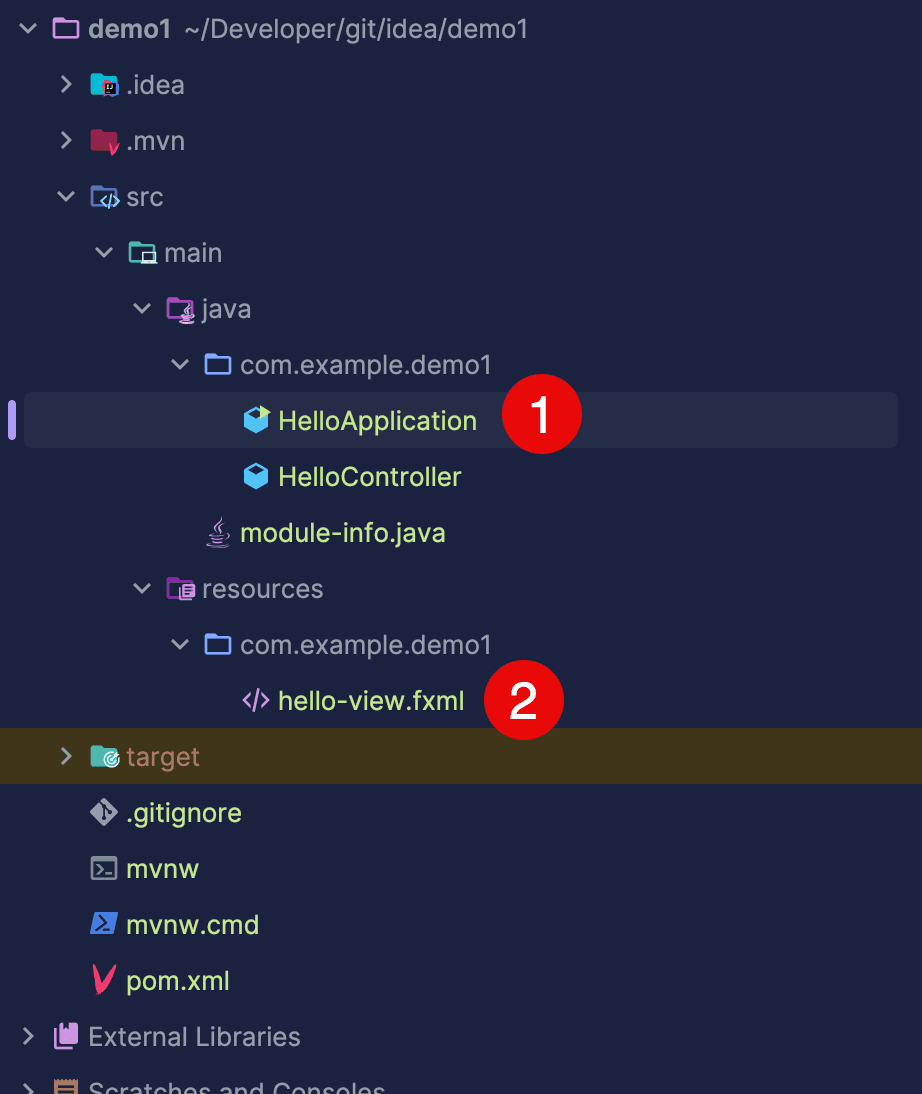
-
In Project tool window, navigate to your FXML file (e.g.,
src/main/resources/com/example/hello-view.fxml). -
Right-click > Open In SceneBuilder.

IntelliJ: Right-click FXML > Open In SceneBuilder
4.2: VS Code
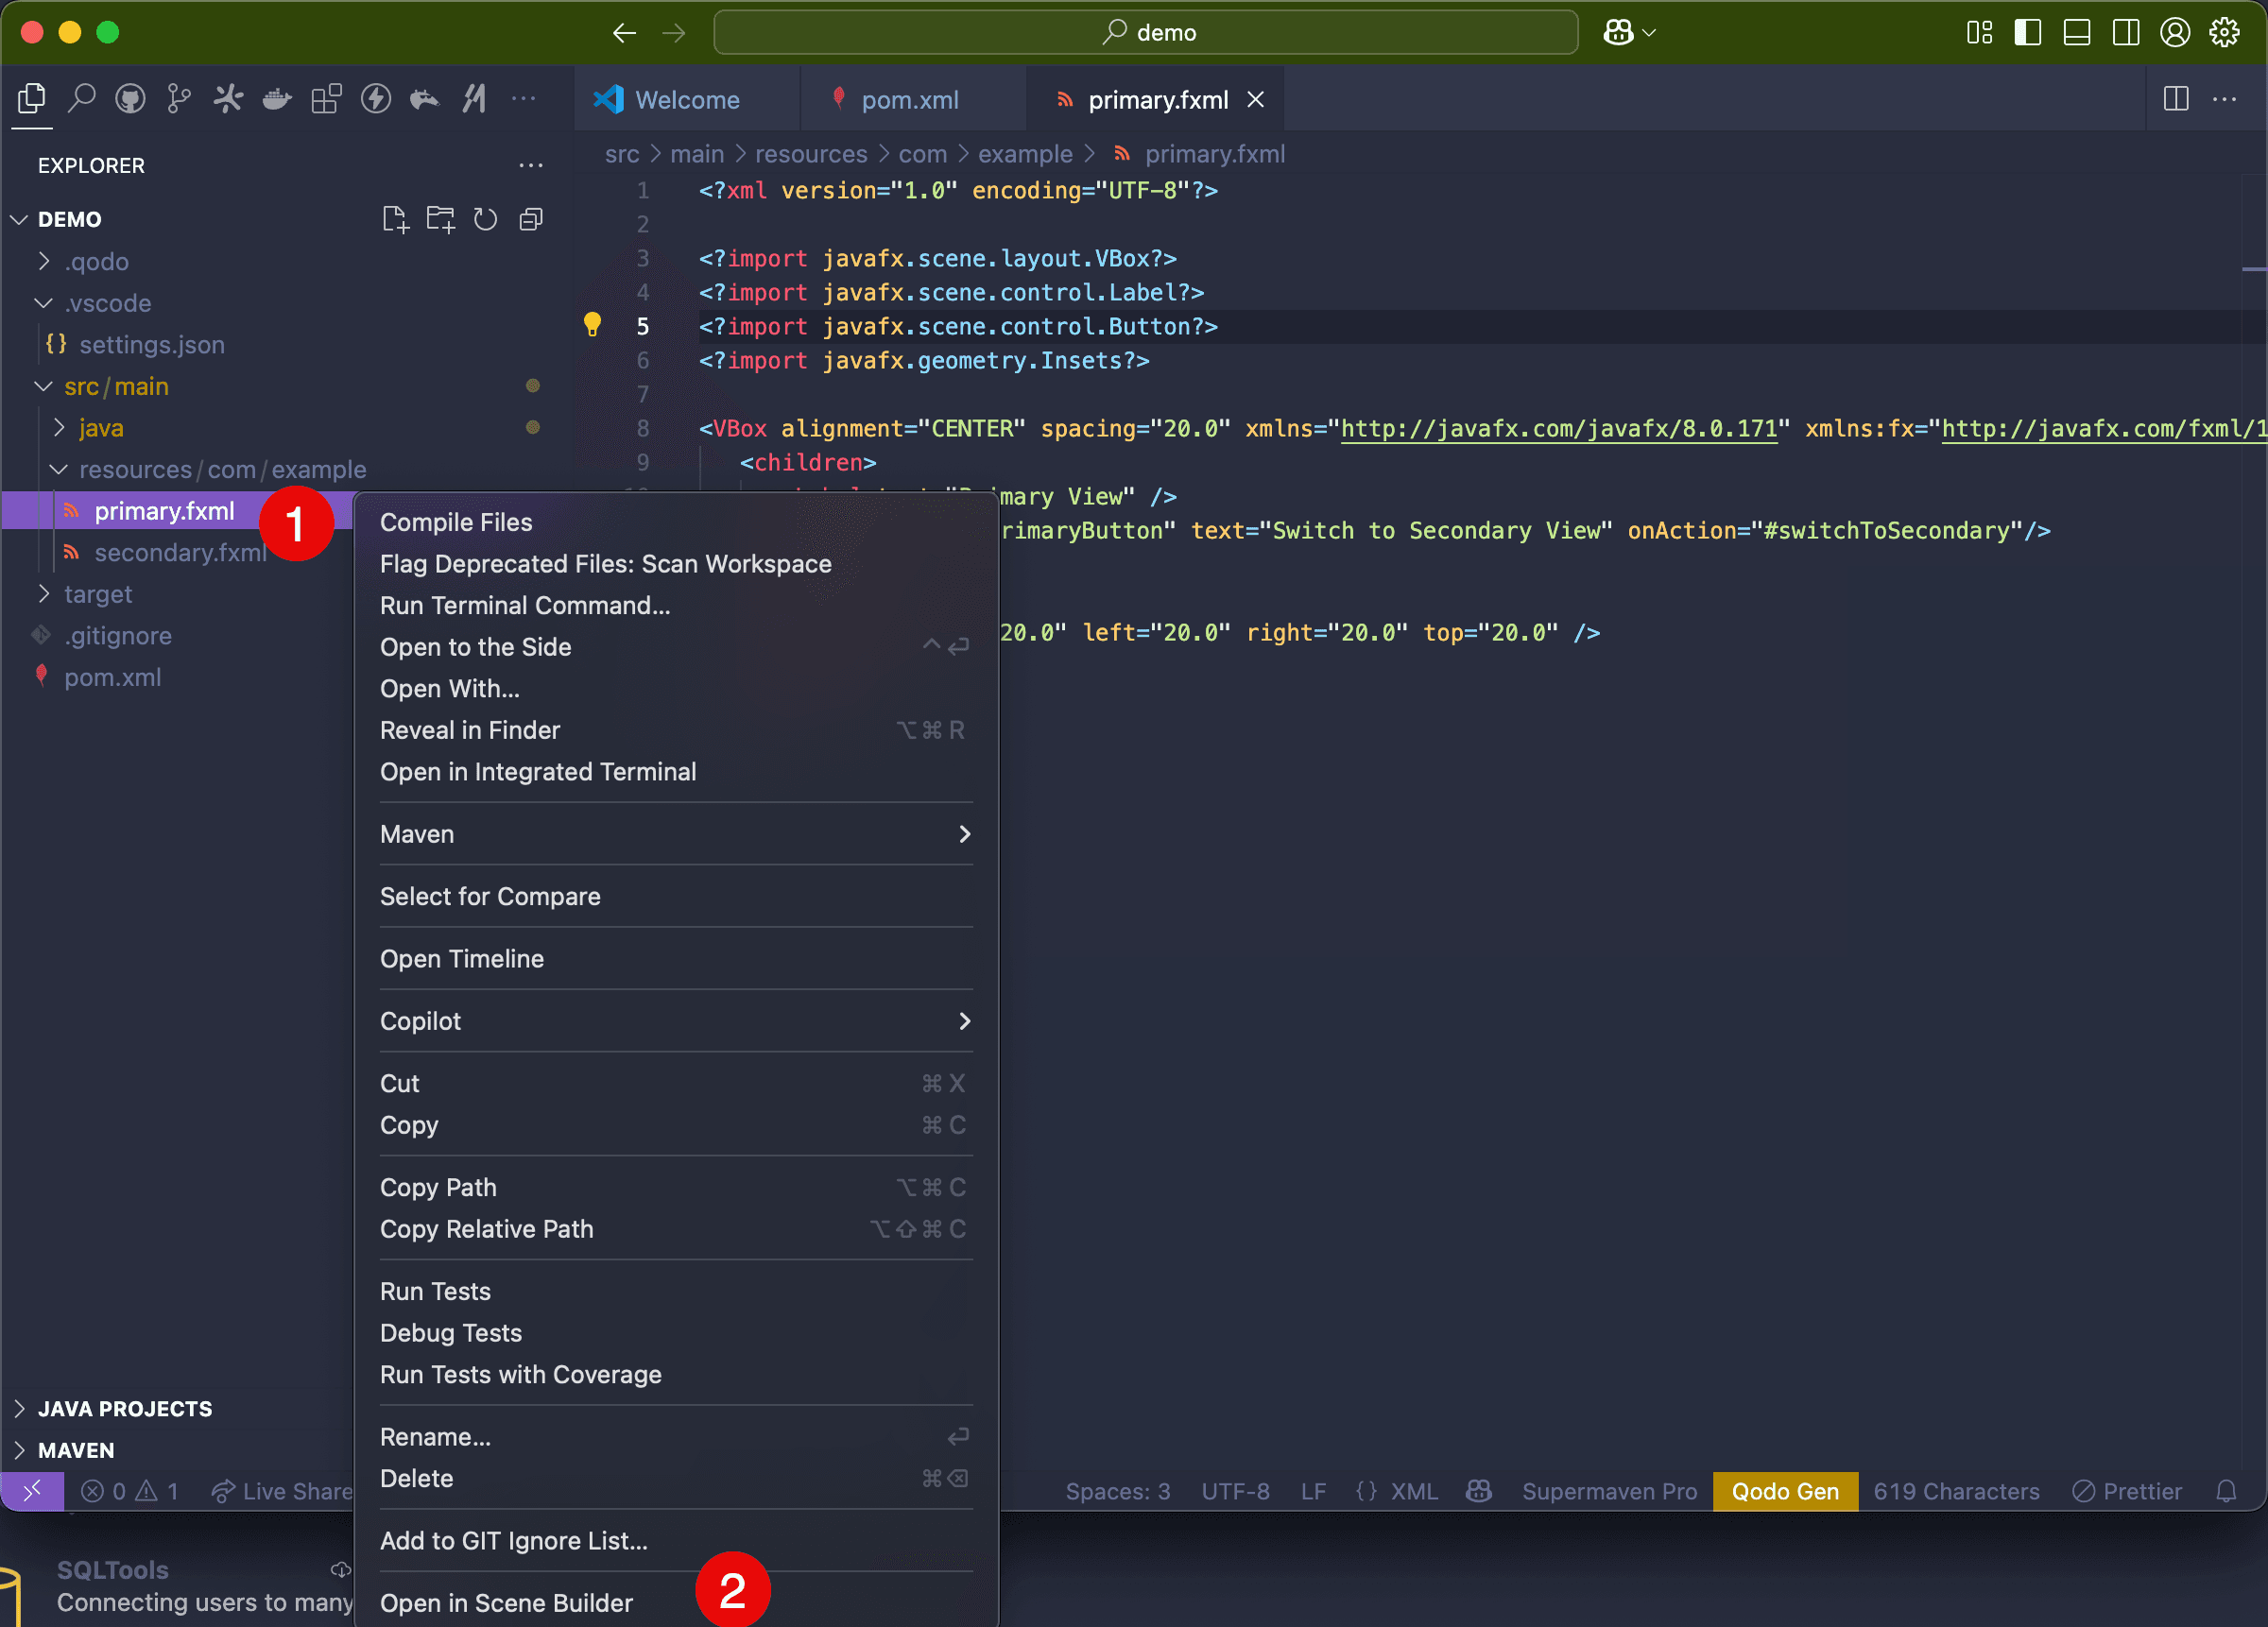
- In Explorer, navigate to FXML file (e.g.,
src/main/resources/com/example/primary.fxml). - Right-click > Open in Scene Builder.
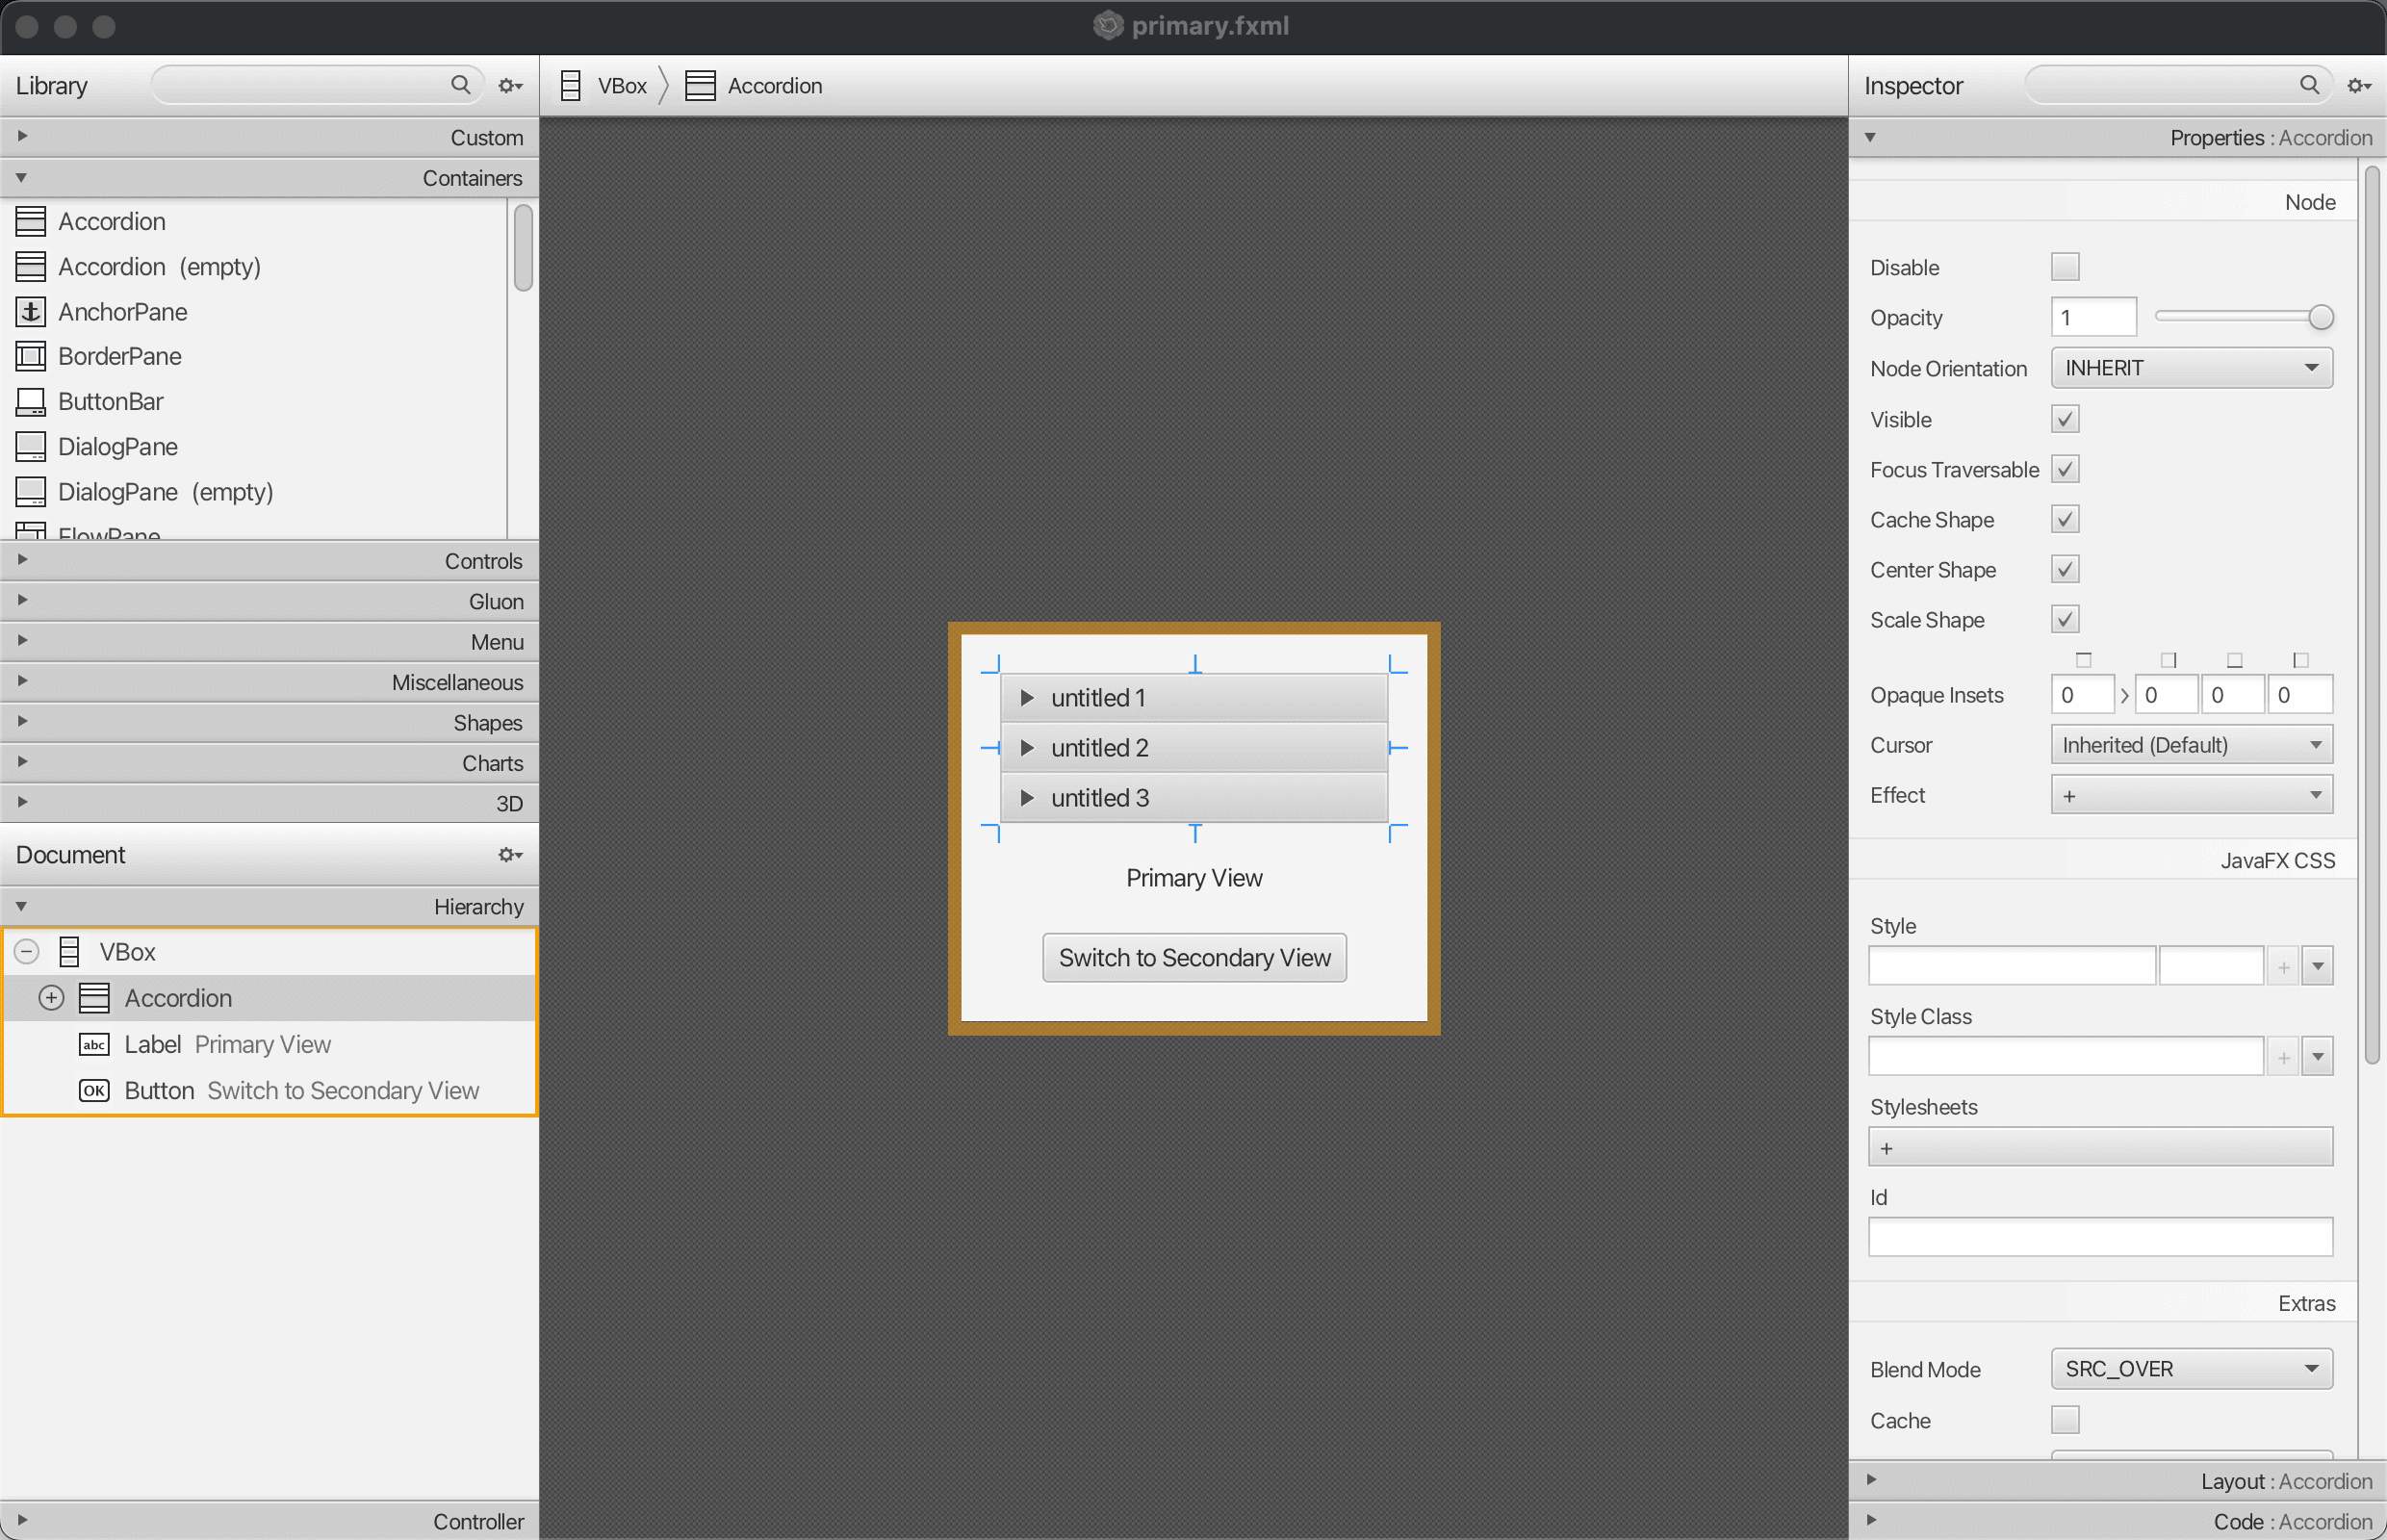
4.3: Editing with Scene Builder
Scene Builder launches as a separate application, loading your FXML file for visual editing (component hierarchy, drag-and-drop, property inspection).
Changes saved in Scene Builder are written back to the .fxml file in your project.
Part 5: Diagnosing Errors
5.1: JavaFX & JDK Version Compatibility
- Issue: Errors like "package does not exist", "cannot find symbol", or runtime linkage errors with JavaFX components.
- Fix: Ensure your JavaFX version (in
pom.xmlorbuild.gradle) is compatible with your project's JDK. For JDK 21, use JavaFX 21+.<!-- Maven pom.xml example for JavaFX 21 with JDK 21 --> <properties> <project.build.sourceEncoding>UTF-8</project.build.sourceEncoding> <maven.compiler.release>21</maven.compiler.release> <!-- Corresponds to JDK version --> <javafx.version>21.0.2</javafx.version> <!-- Or latest compatible JavaFX 21+ version --> </properties> <dependencies> <dependency> <groupId>org.openjfx</groupId> <artifactId>javafx-controls</artifactId> <version>${javafx.version}</version> </dependency> <dependency> <groupId>org.openjfx</groupId> <artifactId>javafx-fxml</artifactId> <version>${javafx.version}</version> </dependency> <!-- Add other JavaFX modules as needed: javafx-graphics, javafx-media, etc. --> </dependencies> <build> <plugins> <plugin> <groupId>org.apache.maven.plugins</groupId> <artifactId>maven-compiler-plugin</artifactId> <version>3.11.0</version> <!-- Or newer --> <configuration> <release>${maven.compiler.release}</release> </configuration> </plugin> <plugin> <groupId>org.openjfx</groupId> <artifactId>javafx-maven-plugin</artifactId> <version>0.0.8</version> <!-- Or newer --> <configuration> <!-- Ensure this matches your main application class --> <mainClass>com.example.yourproject.YourMainAppClass</mainClass> </configuration> <executions> <execution> <!-- Default configuration for running via IDE --> <id>default-cli</id> <configuration> <mainClass>com.example.yourproject.YourMainAppClass</mainClass> </configuration> </execution> </executions> </plugin> </plugins> </build>
Verify JDK in IDE: Confirm IDE's project SDK matches your JavaFX dependencies and build config.
For general JDK,
Core Java, Maven & Gradle Setup GuideJAVA_HOME, multiple Java versions, and build system (Maven/Gradle) setup, refer to the.
5.2: Scene Builder Integration Issues
- Issue: "Open in SceneBuilder" option missing or not working. - Fix: 1. Confirm Scene Builder is installed. 2. Verify IDE path to Scene Builder is correct (Part 2.2 & 2.3). 3. Ensure FXML file is valid XML. 4. Restart IDE.
5.3: FXML Loading Errors at Runtime
- Issue:
javafx.fxml.LoadException,InvocationTargetException,ClassNotFoundException. - Fixes:
- Controller Class Path:
fx:controllerin FXML must be fully qualified (e.g.,com.example.yourproject.MyController).<VBox xmlns:fx="http://javafx.com/fxml/1" fx:controller="com.example.yourproject.PrimaryController">...</VBox> - Controller Constructor: Must have a no-argument constructor.
@FXMLAnnotations: UI elements in FXML withfx:idneed corresponding@FXMLannotated fields in the controller.// PrimaryController.java public class PrimaryController { @FXML private Label myLabel; // fx:id="myLabel" @FXML private void initialize() { /* ... */ } }- Resource Path: FXML files in correct resource path (e.g.,
src/main/resources/com/example/yourproject/) and loaded correctly:Parent root = FXMLLoader.load(getClass().getResource("primary.fxml")); // Relative to class // Or: FXMLLoader.load(getClass().getResource("/com/example/yourproject/primary.fxml")); // Absolute from classpath root - Build System: Ensure Maven/Gradle includes resources.
- Controller Class Path:
General Troubleshooting
Clean and Rebuild:
./mvnw clean installor./gradlew clean build.Check Logs: Review the full error stack trace in the IDE console.
Simplify: Create a minimal reproducible example to isolate the issue.
5.4: IntelliJ IDEA's Maven Project Options (If using Maven)
pom.xml file or the project root in IntelliJ IDEA, you get a Maven-specific context menu. Here's what the common options do: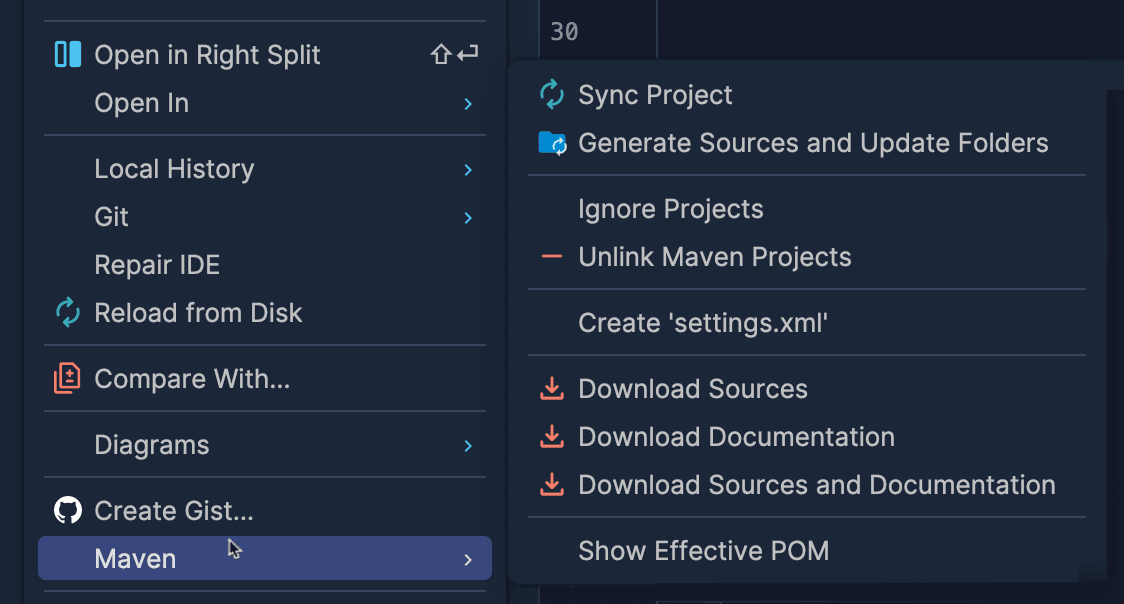
Sync Project: Reads your
pom.xmlfile and updates IntelliJ IDEA's project structure, dependencies, and settings to match. Use this after changingpom.xmlor when the IDE appears out of sync.Generate Sources and Update Folders: Runs Maven phases that might generate source code, such as annotation processors or build plugins, and tells IDEA to recognize those generated sources and folders correctly.
Ignore Projects: Temporarily tells IntelliJ IDEA to stop treating the selected module as a Maven project. This can help when troubleshooting or excluding a module without removing it.
Unlink Maven Projects: Removes Maven integration from the project within IntelliJ IDEA. The
pom.xmlfile remains, but IDEA will no longer manage dependencies or build settings through Maven until you re-import the project.Create 'settings.xml': Creates a Maven
settings.xmlin~/.m2/settings.xmlif one does not already exist. Use it for user-specific Maven settings such as custom repositories, proxy settings, or server credentials.Download Sources / Documentation: Fetches dependency source code and Javadoc from Maven repositories so you can navigate library code and read docs directly in the IDE. “Download Sources and Documentation” performs both actions together.
Show Effective POM: Calculates and displays the final Project Object Model Maven uses, including inherited parent settings, active profiles, and merged configuration.